Before starting you must clone the directory of the PiArm from the GitHub to program it. To clone the directory follow the steps below:
- On the terminal paste the repository link with the command: "git clone"
git clone https://github.com/sbcshop/PiArm.git
- A directory will be created on your Pi desktop inside “Pi” folder.

Controlling using GUI
PiArm hardware is a Python-based code capable of running on any platform like Linux or Windows. It can be controlled using a graphical interface. The graphical interface is one of the easiest ways of controlling to which everyone is familiar.
On opening the PiArm directory you’ll find many files. Firstly, create a desktop shortcut. To create the shortcut copy the "piarm.desktop" to the desktop.
Note: To create your own desktop shortcut refer to - this link here
All about GUI
A detailed explanation of PiArm GUI is explained below:

Serial: The motors and the controller communicates with serial communication. Select the serial port to start the communication.

Note: To communicate you need to first enable serial communication in your Pi. To enable it, go to Menu > Preferences

> Raspberry Pi Configuration

> Interfaces

> Enable Serial Port > disable serial console

-
Port: Enter the port name "tty*"
NOTE: If you are using Raspberry Pi 3 and above version then connect to "ttyS0" else connect to "ttyAMA0".
If you are connecting the shield via USB port then, in that case, the port name will change. In Raspberry Pi 3 and higher, it is "ttyUSB*".
- Baudrate: There are different baud rates so that communication between the motor and controller is possible. Here, the PiArm motors work on 115200 baudrate.
- Open: To start the serial communication with motors, click on the ‘Open’ button. If the communication is established successfully the red colour indicator will change to green.
Control Panels (left panel)
-
Record: This block is used to record the parameters of the motors, read and write the positions and torque of the motors.

- Read: This function is used to read the current position of the PiArm’s motors.
- Write: This function is used to write the command to the controller to move the PiArm.
- Default position: This function helps you to set the PiArm to its default position.
- All Torque enable: This function enables the torque of all the motors connected.
-
Group: This block is used to create the actions groups i.e set of commands. To add the command you first need to create a group. For example, if you want to move your arm towards the right then create a group with a name like "moving_right" or anything of your choice.

-
Add: To create a new group click on the “Add” button. A popup will appear to enter the name of the group.

- Delete: To delete a particular group, select the group from the list of the action group and click on "Delete" button.
- Import: If you want to import any group from the example files inside the PiArm directory to the list of an action group on the GUI.
- Export: If you want to export any group from the list of an action group on the GUI to the example files inside the PiArm directory. The files will be exported to '~/PiArm/Export Files/GroupName'
-
Add: To create a new group click on the “Add” button. A popup will appear to enter the name of the group.
-
Command: A command is a collection of position and time data for each of the motor in PiArm. These commands are useful for recording a PiArm movement to repeat the same movement later.

- Add: After reading the position of the motor click on "Add" button to add the command.
- Delete: To delete the command select the command and click on "Delete" button.
- Insert: To insert a command in between the 2 sets of commands then select the command above which the new command is to be inserted and click on "Insert" button.
-
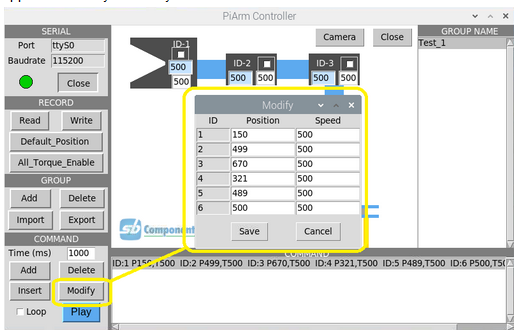
Modify: It helps to edit the command’s individual data like motor 1 position and time. To modify you need to select a command and click on "Modify" button. A popup will appear to modify manually.
-
Loop: Loop check button on the frame runs the set of commands in a group infinitely.

-
Play: This function runs the commands of the selected group.

-
Time(ms): It is the time or delay between the two commands. The time is in milliseconds.


The Mainframe (center panel)
- The GUI mainframe: The mainframe shows a PiArm with some functionalities like button, entry widgets and check buttons in it.

- Position widget: This entry widget allows you to enter the position of the motor manually as well as you can see the reflection of the command when the command is executed. The first top or left entry box is the position of each motor.
- Time widget: The time in this widget is the time taken by the motor to execute the command. The delay between the execution of the two motors.
- ID check button: To enable the torque of the particular ID click on the button of that particular ID number.
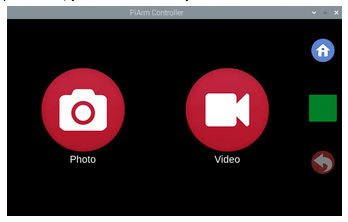
- Camera: There is a feature of taking photos and videos. On clicking the "camera" button you’ll see two options - photo and video.

According to your requirement, you can select any one of them.
- Close: It will close the GUI.


How to control PiArm
-
Step 1: Enter the port as “ttyS0” and set the baudrate to "115200" and then click on “open” to start the communication.

-
Step 2: Create a group.

A group with the name "Test_1" is created.
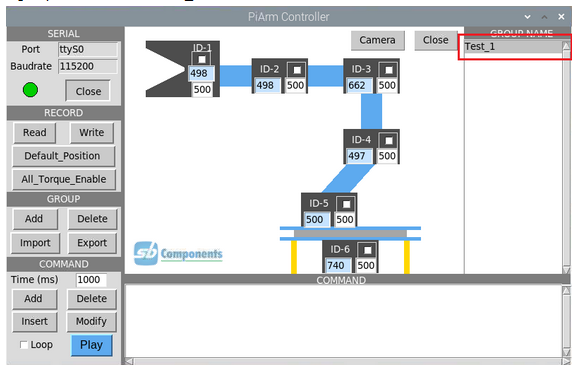
Note: You can also create multiple groups in it. The procedure remains the same.

-
Step 3: Move the position of the arm in the desired direction manually.
GIF
-
Step 4: Read the position of the motors by clicking on the "Read" button. It will read the current position of the motors.

Note: You can also manually enter the position of the motor and then write the values to the motors along with the time which is set to 500.
The red part shows the entry widget where you can edit the positions and next to it is the entry widget for time. If you are entering manually then make sure after writing the positions click on the "write" button.
-
Step 5: After reading the position add the command by clicking on the “Add” button. You will also see the reflection in the position widget in the mainframe.

-
Step 6: Once you are done with adding all the commands now export the group. By exporting you’ll save that particular action group to the "Export files" in the PiArm directory.

-
Motor LED Indicators: There are LEDs on motors which are indications to motor property like position and voltage. You can turn of LEDs from the servo configuration software. The LEDs will blink if the value of voltage or position is out of range.
Red colour LED will blink if there is low or high voltage. If a voltage is configured for the voltage range of 6-10 volts. If the voltage is below 6 volts or higher then 10 volts, the red LED on motors of PiArm will begin to blink. In this case, you need to change the power source to the PiArm.
Blue colour LED will blink if the position of the motor is out of range. For example- if the motor of PiArm is set under a range of 50 to 180 degrees, and the motor is below 50 degrees or higher then 180 degrees the Blue LED will start blinking.


GitHub link- https://github.com/sbcshop/PiArm