Raspberry Pi Pico has been a successful device among the tech-community because of its powerful IC and compact design. It has become one of the most demanded items in the community of tech-enthusiasts that got a lot of attention from the market. Many users want to develop their robots with Raspberry Pi Pico and for that they need Pico Motor Driver HAT.
Let’s take a look at Hi-Tech Pico Motor Driver HAT and its features that can make your experience with the robots rise better on a whole new level. First we’ll understand key features and specs of Raspberry Pi Pico quickly.
About Raspberry Pi Pico
Raspberry Pi Foundation launched Pico to innovate people more about programming and hardware so that they can become the part to scale up the level of technology. On the other hand, it is increasing the demand of the hardware that can be attached on the top of Raspberry Pi Pico to make it work in the projects efficiently.The majority of the RP2040 microcontroller pins are connected to the user IO pins on the left and right edges of the board, according to the configuration of the Raspberry Pi Pico. The RP2040 IO is used for internal board functions such as driving an LED, controlling the onboard Switched Mode Power Supply (SMPS), and sensing the system voltages to ensure that the system runs efficiently. SB Components has built a Motor Driver Hat for Pico to run 2 DC motors simultaneously or 1 stepper motor. We know that you are so excited about the HAT and in this blog we will elaborate it in the details.
Pico Motor Driver HAT
The Pico Driver Motor HAT is a DC motor control module driven by a single H-bridge IC L293D with a motor input supply range of 6 V to 12V with a dedicated on/off switch. It is designed to link two DC motors (at the same time) or one stepper motor, allowing the user to create projects with a small footprint and high performance. Line following, object following, wall following, and Maze-Solver robots are all simple to build. You can connect your motor with the help of Pico Motor Driver HAT and build smart projects. 
H-Bridge IC L293D
Pico Driver Motor HAT consists of one H-Bridge IC L293D which enables the users to run Two DC motors simultaneously or one stepper motor. You can control the speed and direction of the motor with it that would make the project better and in control of the user. The Maximum Peak motor current is 1.2A with Motor voltage Vcc2 (Vs) 6V to 12V. It is available in 16-pin DIP, TSSOP, SOIC packages. As the name suggests, it mainly helps the users to run the motors efficiently. The change of the direction of the motor is a key feature of the IC that is done by the changing of the polarity of its input voltage. Many readers might think that how the change of the polarity happens in the HAT and the answer is the H-bridge. H-bridge contains four switches with the motor and makes the H-shape circuit arranged and from it a user can change the polarity of the input voltage that would change the direction of the motor. 
Features
- Connect Up to 2 DC Motors or 1 Stepper Motor
- One H-Bridge IC L293D
- Motor Supply range 6V - 12V
- Dedicated On/Off Slider Switch
- Standard Raspberry Pi Pico Connectivity
Specification
- Motor Control - Up to 2 DC Motor or 1 Stepper motor
- Motor Input Supply - 6 - 12V
- On/Off Switch - yes
- External Output - Yes, for Pico
Application
Let your robotic dreams come true and build advanced and hi-tech products with the Pico Motor Driver HAT. You can make infinite products with this HAT with your creativity. There are following examples that you can use the Pico Motor Driver HAT
- Robotic Car - Connect and build robotic cars with the Pico Motor Driver HAT. One of the best things to play with your friends.
- Smart Gate - Now build a smart gate by installing a motor in your gates.
- Fire-Fighting Robot - Challenge your friends with the fire fighting robots.

Installation
This resource is designed to provide a detailed process of the installation of Pico Motor Driver HAT via micropython. You can follow the instructions that are mentioned below to run your project in an efficient way
- Stack Raspberry Pi Pico on female header of Pico Motor Driver HAT.
- Connect USB cable on Raspberry Pi Pico USB port.
- Now use example code "Motor_Test.py" from Pico Motor Driver HAT's github repository in any micropython supported ide (preferred thonny ide). Source code : https://github.com/sbcshop/Pico-Motor-Driver
- Copy paste code in thonny ide

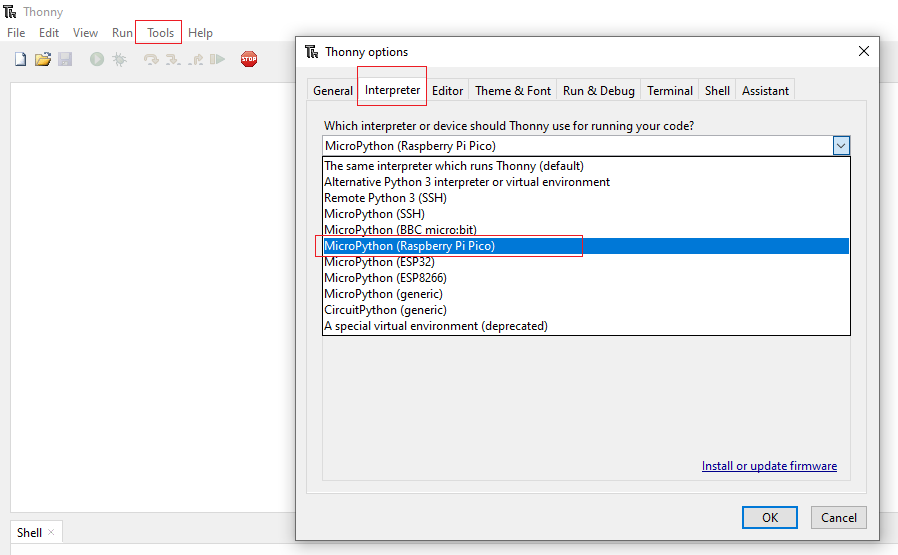
- Choose an interpreter as MicroPython (Raspberry Pi Pico)

- Connect Motor and external supply as shown below and turn on slider Switch:

- Click on the green play button to run an example on Pico Motor Driver HAT.


