Experience effortless parking with the PiCoder, an automatic garage/barrier gate opening system powered by the Raspberry Pi Pico Learning Ki
Effortless Parking: Automatic Garage / Barrier Gate opening system
Story:
Automatic barrier/garage door opening is a system that enables the opening and closing of garage doors without manual intervention. The system typically utilizes sensors and motors to detect the presence of vehicles and activate the door-opening mechanism accordingly.
One common approach is to use a motion sensor or a proximity sensor to detect the presence of a vehicle in the garage. Once the sensor detects the presence of a vehicle, it sends a signal to a microcontroller or a computer that activates the motor responsible for opening the garage door. The door is then automatically opened to allow the vehicle to enter or exit the garage.
Automatic door opening systems provide a number of benefits, including convenience, and energy efficiency. They also reduce the risk of accidents or injuries associated with manual door-opening mechanisms.
Pin Connection:
Let’s get started,
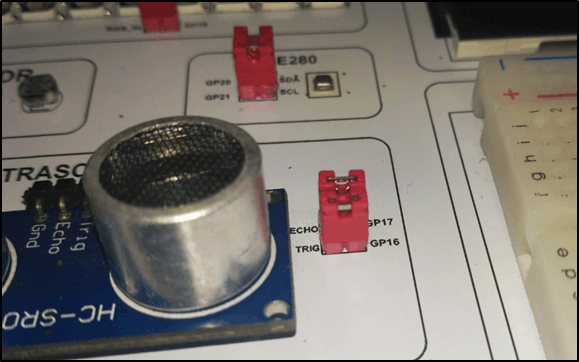
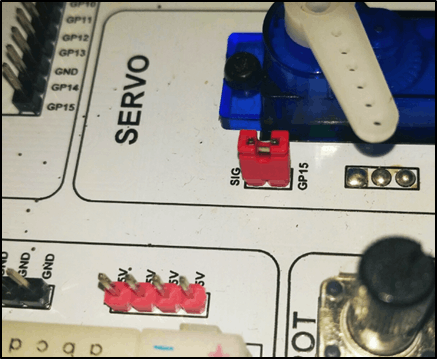
To complete this project, we will be using the Picoder Learning kit's onboard Ultrasonic sensor and servo motor. Here's the pin connection information that you'll need to follow:
- Raspberry Pi Pico W <-> Ultrasonic sensor
Connect 5V to VCC
Connect GPIO17 to ECHO
Connect GPIO16 to TRIG
Connect GND to GND
- Raspberry Pi Pico W <-> Servo motor
Connect GPIO15 to the signal (usually the orange wire)
Connect 5V to VCC
Connect GND to GND
Don't worry if this seems daunting; the kit includes simple jumpers for the GPIO pins, which are plainly labeled as "GP" in the figure below.
The basic operation of the system is portrayed in the graphic below.
To setup Raspberry Pico W watch this tutorial -> BlinkLED project
After that, simply copy the code script file below to your Picoder and your system is ready to automate your garage or any barrier Gates.
import sleep
from machine import Pin,PWM
import utime

#configure ultrasonic sensor pins
trigger = Pin(16, Pin.OUT)  #set GP16 as OUTPUT connected to Trig pin of Ultrasonic
echo = Pin(17, Pin.IN)		#set GP17 as INPUT connected to Echo pin of Ultrasonic

buzzer = Pin(22, Pin.OUT) #set GP12 as OUTPUT where buzzer connected

servo = PWM(Pin(15)) #configure GP15 for PWM where servo sig connected
servo.freq(50)

def ultrasonic():
    timepassed = 0
    trigger.low()
    utime.sleep_us(2)
    trigger.high()
    utime.sleep_us(10)
    trigger.low()

    while echo.value() == 0:
        signaloff = utime.ticks_us()
    while echo.value() == 1:
        signalon = utime.ticks_us()

    timepassed = signalon - signaloff
    distance_cm = (timepassed * 0.0343) / 2
    distance_cm = round(distance_cm,2)
    return distance_cm

def doorOpen():
    buzzer.value(1) #Switch ON Buzzer for audio alert
    for position in range(1000,6000,50):
        servo.duty_u16(position)
        sleep(0.01)
    buzzer.value(0) #Switch OFF Buzzer


def doorClose():
    buzzer.value(1) #Switch ON Buzzer
    for position in range(6000,1000,-50):
        servo.duty_u16(position)
        sleep(0.01)
    buzzer.value(0) #Switch OFF

thresholdDistance = 4  # change this as per your requirement, when to trigger servo gate

while True:
    distance = ultrasonic()
    print("Distance =",distance)

    if distance < thresholdDistance:	#Check if vehicle close to sensor,
        doorOpen()
        print("Door Opened!!")
        while distance < thresholdDistance:        #Wait for vehicle to pass
            distance = ultrasonic()
            sleep(1)
        doorClose()
        print("Door Closed!!")

    utime.sleep(0.5)